How to Remove Tile Floor Like an Expert
Whether you want to install new flooring yourself or revamp your floor entirely, you'll need to know how to remove tile floor from your home. It can be a tough job, but you can definitely do it yourself. With just a few tools and some elbow grease, you can make a home upgrade that will pay off in the long run, all on your own.
If you are considering removing ceramic tile for your next home improvement project, here are a few tips to help.
 Wear a long-sleeved shirt or sweatshirt to protect your arms, along with durable pants and close-toed shoes or work boots.


Plan Your Ceramic Floor Tile Removal Ahead
Removing tile is no small task, but the more prepared you are, the smoother it will go. Set aside at least one full day for the work and consider how you’ll manage safety, tools, and debris. Here’s a quick checklist to help you start strong.Block off a full day
Give yourself plenty of time. Tile removal is labor-intensive and it may take longer than expected depending on the room and how the tile was installed. It’s also usually messier than it looks, and you’ll need time to deal with the clean up. Avoid rushing by reserving at least one full day (or weekend) to get the job done safely.Protect your space
Lay down drop cloths or plastic sheeting around the work area to catch dust and debris. Cover vents to prevent dust from spreading through your HVAC system, and move any nearby furniture out of the way.Gear up properly
Having the right equipment makes a big difference in how safely and efficiently you can work. You can find most of the equipment you’ll need to remove tile floor at your local hardware store, including:- A putty knife with a stiff blade
- A small hammer
- A flat garden spade
- An iron pry bar
- Chisel
- Goggles/ wrap around safety glasses are a good way to protect eyes from loose material or other flying particles that may cause damage.
- Protect hands with quality medium to heavy gloves to prevent cuts or scratches from sharp edges.
- You will also need to put on a sweatshirt or a shirt with long sleeve.
Line up your tools
Make sure you have all of the necessary tools on hand before you begin. This will help you avoid interruptions when you're in the middle of the job, so you can keep your momentum going from start to finish.Plan for debris removal
Tile removal generates a surprising amount of heavy waste. Renting a dumpster from Bin There Dump That lets you toss debris as you go and have it hauled away when you’re done. You can work at your own pace and clean as you go for a safer, more organized workspace that makes the whole project less stressful.Know when to call for help
If your project involves delicate areas or structural questions, consider a quick consultation with a professional. If you don’t have access to an expert, online resources dedicated to tile removal can provide valuable guidance and safety precautions.
Succesfully Removing Floor Tiles
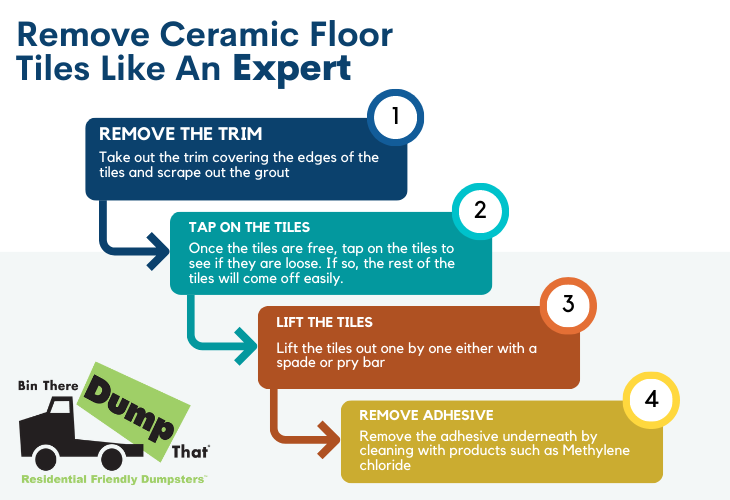
Once you have a plan and the appropriate tools, you are ready to The first step in removing floor tiles is to take out the trim covering the edges of the tiles and scrape out the grout which is found on the perimeter of the tiles. You should also ensure that caulking on the vertical bends is properly scraped out. Once the tiles are free of caulk and grout, tap on the tiles to check if any of them haveso as to check whether any of the tiles has loosened. If you detect a loose tile, then the rest of the tiles should come off easily. To protect yourself, you should also use special blade holders. For those parts that prove to be very tough, a heat gun can come in handy. However, this solution should be a last resort when grout proves too difficult to scrape.
Removing the Adhesive Underneath The Tiles
After you’ve removed the ceramic tiles, you’ll likely be left with adhesive or cement remains stuck to the floor. Cleaning this up is an important step before installing new flooring. One option is to use a commercial adhesive remover like methylene chloride products. These products can be very effective, but they also come with health risks. The fumes can be harmful if inhaled, so make sure the area is well-ventilated and wear a mask or respirator for protection. It’s also smart to wear gloves and limit your skin contact with any residue. If you’d prefer a more natural method, try using boiling water. Pour it directly over the leftover adhesive and let it sit for a few minutes. The heat helps soften the glue, making it easier to scrape away with a chisel or putty knife. Whether you go the chemical or natural route, take your time. A clean, smooth subfloor will make all the difference in your new tile installation.